Saturday, September 29, 2012

carrot cake muffins


Hooray, the days are reaching summer proportions. It felt like the coldest winter ever, but we seem to be on the other side of it now and I'm looking forward to spending time at the beach.

Anyway, to celebrate the dramatic weather change, I decided to do some baking. I know, crazy.. why would you turn the oven on in 30C+ weather? Because I wanted some carrot cake, that's why.


I whipped these up, left them to cool then took a plate to my parents place to share. Because what better way to celebrate (and test) than to share. 

Mum said that the muffin was delicious. She even closed her eyes as she ate saying 'you better make sure you put in your blog that your mum loved these'. Done!

Dad said there's a real 'wang' to the icing before the coconut kicks in and that he loved the cake.

I told Joel what Dad said, and he started saying it. Great, now the word wang was being thrown around in reference to my muffins. Nice. Still, it didn't spoil the beauty of them!


Ingredients

(makes 12)

Cake
3 carrots, grated
1 c plain wholemeal flour
1 tsp bi-carb soda
1/4 c raisins
1/4 c walnuts, slightly crushed
1 tsp mixed spice
2 eggs, lightly whisked
1/4 c water
2 tblsp sugar
1/4 c coconut oil

'Icing'
2 tblsp creamed coconut, warmed
2 tsp water
1/2 lime, grated rind and juice
1 tsp agave syrup

Heat oven to 160C and line a muffin tray.
Combine all ingredients for the cake in a large bowl and mix until well combined.
Spoon a tablespoon size amount into each muffin hole in the tray.
Place in oven for 20-30 minutes until cake springs back to the touch.
Remove and cool entirely.

Assembly
Combine all ingredients for the icing in a small bowl until well combined.
Using a butter knife, spread the mixture over the cooled muffins.
Enjoy!


Thursday, September 27, 2012

vegetable quiche


This is just a quick and easy recipe (bar the cooking time), that you can whip together in no time and leave in the oven to cook away.

I've used a variety of vegetables in this because it's so important to keep your diet varied with the vegetables and grains that you use. Each have a unique makeup of vitamins and minerals, so it really is vital that you vary what you eat so that you can get all the beneficial nutrition. If there is a vegie that you haven't heard of before, maybe consider trying it, if you're not sure ask around to see how others add it into their diet.


This recipe made enough to feed a family, but, with just the two of us at home we had a few leftovers. Making meals that are a little bigger is great for a quick lunch the next day or a meal stored in the freezer. This recipe is certainly no exception as it made the perfect healthy lunch for the next day, both cold and warmed up.


Ingredients

(makes 8-10 slices)

4 zucchinis, grated
2 potatoes, grated
3 carrots, grated
2 brown onions, grated
4 eggs, whisked
100g goats cheese, crumbled
¼ c nutritional yeast flakes
salt and pepper to taste

Heat oven to 150 C and grease a medium baking dish with olive oil.
Combine all ingredients well and press into dish.
Bake in oven for 1-1 ½ hours.
Remove from oven, cool for 5 minutes and serve.


Monday, September 24, 2012

garden breakfast juice


The weather is certainly getting warmer here and with it comes the desire for lighter and refreshing meals.
This also means that it is time to bust out the juicer and make it a permanent home on my bench top.


Before Joel ducked out to the markets to pick up groceries, I raided the refrigerator for what remnants of fruit and vegetables we had left to make a super breakfast juice. Talk about quick and easy breakfast! It’s just the clean-up that can be a bit of a fuss.. but it’s worth it.

I fed all the components through the juicer and poured it into a tall glass. Then went outside to sit in my garden to check on my summer seedlings and watch the little red-browed finches build a nest in the ficus tree next to our table and chairs.


Ingredients

(makes 400 mL)

2 carrots
3 oranges, skinned
1 grapefruit, skinned
1 inch piece of ginger
¼ bunch celery
1 medium beetroot

Wash all ingredient thorough and feed through the juicer.
Enjoy!

Wednesday, September 19, 2012

vegan apple pie


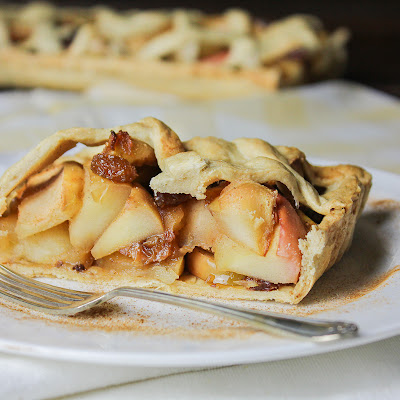
Okay, okay, okay, so my craving for apple pie was not entirely quenched by the tea that I came up with the other day. It kept coming to mind that I just wanted to enjoy a real, warm apple pie - and I finally gave in.


Joel hovered the whole time that I was making this. I've never seen him so interested in something that I am making. He would just wonder into the kitchen, sip on his beer and say 'mmm I love pie'.

The smell that filled the house was this warm, caramely rich and deep appley cinnamon smell that made it hard not to dig in as soon as the pie came out of the oven.

To top off this evening, a book that I have been eyeing off for over a year now has finally been released. I have it downloaded on the kindle app on my ipad ready to go.

So, I am going to love and leave you as I have a date with a book and some pie.


Ingredients

(makes 6-8 slices)

Pastry
2 c white spelt flour
1 tblsp fine sugar
3 tblsp non-dairy butter
45 ml iced water

Filling
4 apple (skin on), cored and sliced 1cm
1/4 c currants
1 tsp vanilla essence
1 tsp ground cinnamon
1 tblsp water

Pastry
In a medium sized bowl combine flour, sugar and salt.
Rub butter into flour until it resembles fine bread crumbs.
Create a well in the middle and slowly add water, cutting it in with 2 forks. 
Add enough water for the pastry to come together without being sticky.
Roll into a ball and refrigerate for 30 minutes.
Cut 1/4 of the pastry out and place back in the refrigerator.
Roll out the 3/4 of the pastry between two baking paper sheets.
Remove one side of the paper and invert into baking dish, press down and slowly remove the top sheet.
Trim off excess pastry and use to fill in any gaps.
Using a fork, poke holes in the pastry and place in oven for 20 minutes until golden.
Remove and cool.

Filling
While the pastry is in the refrigerator cooling, start the filling.
Combine all ingredients in a medium sized pot and heat on medium for 20 or so minutes until apples are softened.
Remove from heat and cool.

Assembly
Fill the pastry dish with apples.
Then, roll out the final 1/4 of pastry and cut into 2cm strips.
Lay each strip down diagonal, about 3cm apart down the length of the dish.
Repeat in the opposite direction.
Return to oven to bake for a further 20 minutes until golden.


Monday, September 17, 2012

red lentil burgers


Is life just busier? I feel the days are going faster than ever and any spare time that I have gets filled up pretty quickly. I don't mind though, I love fitting as much into life as possible that's just living, right?!

After a busy weekend and a full day at work I came home, chopped the fire wood, started the fire, then got started on these beauties.

Luckily there were heaps more burgers than I anticipated which means I can stock the freezer for a quick lunch option on work days. Sometimes with all the rushing, it's good to have a healthy back-up meal that you can defrost for a quick satisfying lunch or dinner and this is surely one.


Ingredients

(makes 20)

1 1/2 c split red lentils, soaked for 6-8 hours

1 c walnuts
2 carrots, grated
1 brown onion, grated

1 c besan flour
1 tsp bi-carb soda
1 tblsp savoury yeast flakes
2 eggs, lightly whisked

olive oil, for greasing
salt and pepper, to taste

Heat oven to 180 C and line a large baking tray with parchment paper then lightly grease with oil.
Bring lentils to boil in a heavy based saucepan.
Cook for 15-20 minutes until soft, then drain and set aside to cool.
Add walnuts to a food processor/blender and pulse until crumbled.
Mix walnuts, carrots and onion in a medium sized bowl.
Next add in the lentils and remainder of ingredients, mixing until well combined.
Using wet hands, scoop small handful sizes of the mixture then roll into a ball.
Place on tray and push down lightly to flatten out.
Repeat until all the mixture has been used.
Place tray in oven for 25 minutes, then flip the burgers and bake for a further 15 minutes.
Serve!

Friday, September 14, 2012

homemade apple pie tea


Happy Friday! One of the best days of the week. Work is over and there is a full weekend of exciting activities to do.

After a lovely afternoon walk with my sister, I sat down and brewed up a cup of this herbal tea.


Tea something that I have been wanting to make for a while now.

When it comes to what I would put in it, well, there were some apples and pears in the refrigerator and what goes better with apples than cinnamon. Then finally from some recent baking, I had a few left over vanilla beans that I had put aside for this very purpose.

When I first gave it to Joel to try, he said 'wow, it takes just like a McDonalds apple pie'. I just laughed and told him this is as close as he'll get.


Ingredients

1 apple, finely diced
1 pear, finely diced
2 tsp cinnamon sugar
2 vanilla bean skins
optional: brown rice syrup

Optional: Dip vanilla beans in brown rice syrup and drain of any excess liquid.
Finely slice the vanilla beans and toss with the remainder of the ingredients.
Spread out on a dehydrator tray and set to 40C.
Run the dehydrator for 12 hours or until there is no more moisture in the apple bits.
Store in an airtight container and use as you would herbal tea.


Wednesday, September 12, 2012

herbed chickpea salad


Absolutely love chickpeas and it has been too long between friends.

Like, seriously, way too long. I even expressed to Joel how excited I was to be having chickpeas for dinner. He sarcastically responded by saying, ‘that’s great honey’.


As you may have read in the last post, we did a whole lot of gardening on the weekend and I had to harvest all my herbs. I don’t really like using up all my crops as I feel safer with still some sitting there. It’s like, but what if I want some fresh mint later in the week? What will I do then! I even get a little precious and won’t use as much as I like, just so there is always something filling the pots. It makes me feel wealthy in a very green way.

Anyways, with the massive influx of herbs in my kitchen, I have been throwing them into everything. Handfuls of mint in some mineral water, chives in my cabbage wraps for lunch, parsley on EVERYTHING.

Chickpeas are so tasty and make an awesome protein packed ‘throw together’ salad-like meal. And best of all, they are inexpensive. Joel and I lived off legumes when we travelled Europe. They were the most filling, affordable meal addition for us vegetarians/pescatarians, on a very tight budget. 30 Euro cents (40c in Aus) would get you a 500g jar of pre-prepared beans, peas, lentils etc and would easily stretch 2 meals each.

You can get super creative with chickpea salads. I’ve just thrown in whatever I felt like when digging through the refrigerator, but any fresh vegetables will work.


Ingredients

(makes 4 serves)

1 ½ c dried chickpeas, soaked for 6-8 hours (or 2 drained and rinsed tins)
1 spanish red onion, finely diced
1 cucumber, diced
½ c of complimentary fresh herbs (mint, chives, parsley etc)
½ lime juice
salt and pepper to taste

If you are using dried chickpeas, place them in a pot of water and bring to the boil.
Simmer for 20-30 minutes.
Drain and set aside to cool.

Add all ingredients in a medium bowl and toss well to combine.
Place in refrigerator for 30 minutes - 1 hour for flavours to infuse.
Serve and enjoy.


Monday, September 10, 2012

raw kale chips


Productive weekends are the best, and that is exactly what this last one was for us.


We spent the weekend spring cleaning, tidying and sorting. I'm on top of the housework after vacuuming and dusting, washing and hanging, folding and ironing - it feels great. On top of all that we were able to spend heaps of time outside as the weather was stunningly perfect. Lots of walks, sun soaking and getting on top of some much needed garden work. The spring/summer garden is finally planted, and I'm really looking forward to impending crops - impatient much!?

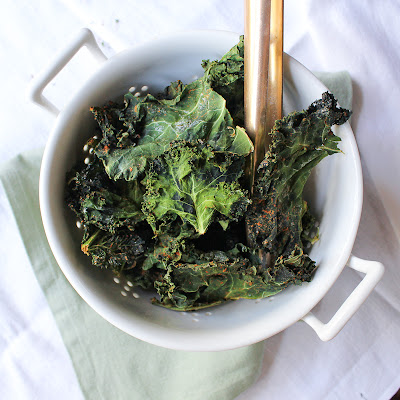
I love that feeling of fulfilment and satisfaction from a wholesome weekend. And what's more, we have been fuelling our bodies with these delicious raw kale chips.


Ingredients

1 bunch of kale, wash and roughly torn
1 tsp paprika
1 tblsp olive oil
pinch or two of salt

Toss all ingredients in a medium bowl.
Arrange on dehydrator trays and turn on to 40 C.
Dehydrate for 12 hours or overnight.
Store in an airtight container for as long as they last. 


Friday, September 7, 2012

citric vitamin water


A trip to the dentist has left me feeling completely sorry for myself and a little tender. I don't have much to share other than it's nice to have polished teeth again.


Luckily a little pre-thought had me make up a jug of this vitamin water. Mainly because I knew I wouldn't be racing home to eat nuts or crackers, but would want something cool and soothing.

The flavours, vitamins and minerals have leached out of the fruit into the water, creating a beautiful refreshing drink with barely any calories.


So after a long day today, I have just sat down to enjoy a tall glass full of this simply tasty vitamin water and share it with you. It would make the most refreshing summer evening drink, something to keep in mind as these spring days get warmer.

Ingredients

(makes 2+L)

1 large grapefruit, sliced into 1/2 cm rounds
1 medium orange, sliced into 1/2 cm rounds
2 inch knob of ginger, finely sliced
water

Add fruit and ginger to a large jug (2 or more litres) and cover with water.
Sit in refrigerator for 4-6 hours to allow flavours to infuse.
Pour over ice or just as is.
Tip: you can top up the water as you go, will last for 2-3 days.

Wednesday, September 5, 2012

dairy-free lamingtons


Lamingtons were a childhood favourite of mine.

They are one of my first baked treats that really worked out well for me, every time. From about the age of 13/14 I loved being in the kitchen baking. I have fond memories of hanging out on the bench helping mum while we made ANZAC cookies.
When I got the gist of baking on my own, most afternoons after school I would be straight into the kitchen and browse through my favourite cookbook of all time – Woman's Weekly ‘Sweet Old Fashioned Favourites’. The go-tos would be: Devil’s Food Cake, Vanilla Slice, Coconut Ice, ANZAC Cookies and of course Lamingtons.


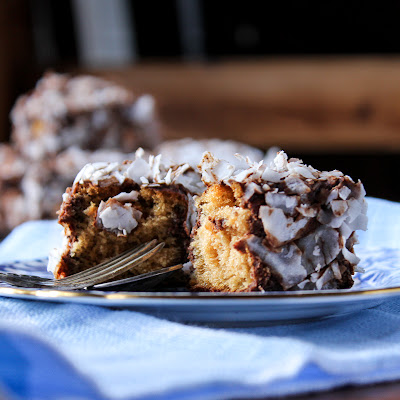
Now that I am older and my tastes have changed, I find myself baking less and less. But I was feeling nostalgic and decided to come up with a dairy-free, low-gi option for one of my all-time favourite homemade bakes.

I was amazed at how similar to the old version these were! The main difference was the coconut sugar in the sponge as it added a deeper rich caramel flavour. Yum!


Ingredients

(makes 12)

Sponge
3 eggs
1/2 c coconut sugar
1/2 c self raising flour
1/2 tsp bi-carb soda

Icing
1/2 c cocoa powder
1/4 c agave syrup
1/8 tsp stevia powder
1 tblsp cocoa butter
1 tblsp creamed coconut or coconut oil
1 vanilla bean, scraped
1/4 c water
tiny pinch of salt

chipped coconut

Sponge
Heat oven to 150 degrees and line a 9"x12" baking dish with baking paper.
Beat eggs in a medium bowl until thick and creamy.
Slowly add coconut sugar until well dissolved.
Next, slowly fold through sifted self-raising flour and bi-carb soda.
Pour mixture into the dish and bake in oven for 20 mins.
Remove from oven and cool completely.

Icing
Bring a saucepan to boil, half filled with water.
Next combine all ingredients for the 'icing' in a small bowl and stir constantly over the boiling water until butter is melted.

Assembly
Slice sponge into small squares.
Dip each square into 'icing' then roll into the chipped coconut and place on a plate.
Repeat the process for all the squares and place the plate in the refrigerator to cool.
Store in an airtight container in the refrigerator for up to a week.

Monday, September 3, 2012

everything from scratch pizza


I love to make everything from scratch. Knowing what goes into the food you make/eat is so important these days. So many times have I looked at the back of packaging and not known 9 out of 10 of the ingredients listed.

Recently, I was having a lunch with my dad and we were at this cafĂ© where their specialty was crepes. Dad was egging me on, so when I asked if it was dairy-free, the lady informed me that they pre-buy their crepes and that she would check. She started reading the list on the back to me: Energy, Fibre, Protein, Carbohydrates, Sodium. She then proudly announced that ‘nope, no dairy here’. I was stunned! She was reading out the nutritional information rather than the ingredients! I had no idea that some people may not know the difference between the ingredients and nutritional information. Not to mention that maybe everyone isn’t as much of a control freak as I am, and may not even pay attention to the ingredients of the food they are eating. It sure was an eye opener..


Anyways, to finish the story, I got my hands on the packet and read that it did in deed have dairy, so opted for a smoked salmon salad instead.

For a while now, I have been wanting to make this caramelised onion and pumpkin spelt pizza - ever since the organic food festival a couple of months back.


Ingredients

(8 slices)

300g pumpkin, skinned, deseeded and cubed
1 tsp olive oil

Dough
7g dried yeast
2 tsp raw sugar
2/3 c warm water

1 c wholemeal spelt flour (+ extra for kneading)
1 tblsp olive oil
pinch of salt

Sauce
5 fresh tomatoes, roughly chopped
8 cloves of garlic, minced
1 tblsp water
2 tsp malt extract
2 tsp apple cider vinegar
pinch of salt

Caramelised Onions
2 large brown onions, finely sliced
1 tblsp olive oil
2 tsp balsamic vinegar

fresh parsley to serve

Firstly, heat oven to 200 degrees.
Toss pumpkin and olive oil and place on a baking tray, in the oven for 30-40 mins.
Next, you will need to start the dough.
Whisk yeast, sugar and water in a small jug and set aside for 2 mins to activate.
Place spelt flour, oil and salt in a medium bowl.
Once the yeast is bubbly and activated, mix it into flour - knead until elastic and smooth (adding extra flour as needed).
Roll into a ball and place into a flour lined bowl. Cover and set aside to double in size (I find it helps to place the bowl above the warm oven).
Combine all ingredients for the sauce in a heavy based pan.
Simmer on medium heat until sauce-like (approximately 10-20 mins).
While you are waiting for your sauce to simmer down, add onions, oil and vinegar to a medium saucepan.
Heat on medium and toss the onions until softened and caramelised.
Remove from heat and set aside.

Assemble
Ensure the oven is on the highest heat setting.
Roll out dough on a floured pizza stone or baking tray (approximately 1.5 cm thick).
Spread over the tomato sauce, then the caramelised onions.
Finally, sprinkle over the roasted pumpkin.
Place in hot oven and bake for 35 mins or until the edges start to darken.
Remove from oven, garnish with parsley and slice into 8 portions.
Enjoy!